Friday 23 February 2018

Who doesn't love an Octopus?

As my children get bigger and louder (sooooo much louder) and want to have friends around more, we have had to look at moving them into their own rooms. Which is fine, but also means we needed to furnish a second children's bed room. Given they spend a bit of time in their rooms, I wanted their rooms to look nice and reflect their personalities (but also not spend much money - bahahahahahahaha). 

I'd snaffled an old chest of drawers from my parents basement when we were there over Christmas (the drawers got to come camping with us from Balclutha to Te Anau to Tekapo to Nelson before arriving in Wellington). While the drawers were perfectly "functional" (sorry no before shots) they were not really pretty. 

Cue an email from Spoonflower advertising 15% off their fabric wallpaper which then led me down the internet rabbit hole of all the different things you can do with said fabric wallpaper..... Before I knew it, we (me & the almost 8 year old*) had selected a design and it was winging it's way from Germany to Wellington resulting in............


I LOOOOOOOVE it, my almost 8 year old loves it and it is so him. He loves creatures and octopuses (octopi?) are currently his favourite. Choice wise, there were loads of options, but, one observation I did make was that because the wall paper is designed for well, walls, most images were quite large scale making it a bit tricksy to find one for this purpose. In the end though, I'm happy with how well these octopus looked sliced up...

It was remarkably easy to stick on; I initially had flashback fears to my school days trying to put duraseal on my school books, but this was easy to cut and could be peeled and stuck several times (which is handy should you accidentally stick a piece on upside down - ask me how I know?). 

There is a bit of "wisping" on the edges and that started from the get go so in terms of its durability, time will tell. End of the day it is on a chest of drawers used by an (almost) 8 year old boy who is not always the most gentle with his things so if I get a year out of it, i'll be happy.  

Cost wise, I paid $31.00 (NZ), for a 3 foot length (almost a metre?) which included shipping ($4.00). It is a bit on the pricey side, however because the drawers themselves were free, I'm happy to pay that to make them look good. 

I guess the real test around a product is would you use it again? and I would! ** We are planning on opening out the (almost) 8 years olds wardrobe so it becomes more of a desk nook and I think i'll get some more for the back of the wall of this; probably in the octopus print again. Given a lot more will be needed, I think i'll wait until Spoonflower do their free international shipping 


*Apparently calling someone 7 when they are "almost 8" is the worst thing you can do to them

** None of my excitement around fabric wallpaper is sponsored, I just love how it turned out

Monday 16 January 2017

A very pleasant surprise

The Named Inari dress is a pattern I've liked for a looooong time and often thought about buying, even gone as far as putting it in my "shopping cart". I could never however, quite made the final step to purchase. My reservation was around what it would look like on someone who had biggish boobies (DD) and i'd read reviews that commented on issues with the armscyses drafting. I did what normal curvy sewers do and asked the community for their opinions, and got some fab suggestions. 
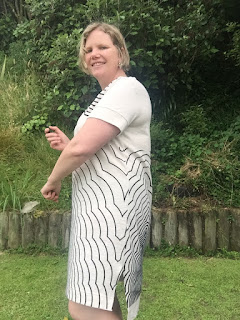
I am a lazy sewer and can never really be bothered making many pattern alterations, so the idea to take the Concord Tee and turn it into a Inari look alike seemed like the perfect solution! Ta da, this was the result!


AND it was easy!! I used this Concord T-shirt dress hack tutorial from Cashmerette, but because I wanted to "cocoon" the silhouette, I gently curved out the sides so that my pattern pieces looked like this:
Front piece
Back piece

I generally make a 12/14D in Cashmerette patterns; for this I sized up to a 16 D as I wanted to have a fair bit of ease. I did end up adding a bit too much length and chopped off a good 10 cms from the hem when it was made up; the down side of this is it doesn't "coccoon" as much as I had originally intended, but only I will know that. 
I likes the deep sleeve bands on the Inari, so simply cut the bands deeper (about 5cms)

I have nooooo idea what the fabric is, it was a remnant from The Fabric Store in Wellington (from memory $5 /$10?). It feels like quite a robust knit, has a bit of stretch and seems pretty breathable, a smidgen see through (if wearing black bra and undies!). 
This was the fabric....... the eagle eyed of you may spot the hole in the piece (left side, about 2/3rds up). My original plan was to applique something over it, however luckily I was able to cut it so it didn't matter. In terms of pattern placement, I could see huge potential for it to go very very wrong with the fabric design....... so spent a while playing around with different design options :)

The upshop is - I have a dress I love and is super comfy. My intention with this make was for a comfy dress I could throw on over togs (swimsuit) at the beach and I got that. What I also got (& didn't expect) was a dress that I've worn to work and out to dinner. 
What also surprised me was that I had thought a cocoon silhouette might not be the most flattering for me, however I was really happy with the fit, shape and how it looks. Its a win!

Monday 2 January 2017

Flashback to the early 90's

I made a comfy comfy comfy dress...... it's the Grainline Alder Shirtdress

Its made from some stash fabric, some kind of cotton that is soft and incredibly drapey. It was also fairly shifty and stretchy when sewing (sad face)

It's comfy, cool on a hot day, however I do feel a bit like I've stepped back into the 90's (or late 80's; you know the pale blue chambray dresses with ruffles) when I wear it. 

This is a pattern I was initially a bit meh when I first saw it, however as I saw more and more versions it started to grow on me. What put me off for ages was that I found it really hard to find versions made by women who had a bigger bust or extra curves around the tummy and hips; in the end I figured why not start the trend and show what it looks like for a curvier figure!
 I made the size 14 and did a FBA (adding an inch). I also ended up taking it in about a inch at the side seams of the bodice as it was looking fairly frumpy before that. 
 The instructions, like all the Grainline patterns were great, I generally followed them. The only exception was I used bias binding for my hem; I figured with the curves of the hem it made sense.   I do love the hemline, the high-low makes it feel pretty swishy and girly


I'm not a big fan of sewing on buttons so added hot pink snaps instead, soooooooooo much easier, and I don't think it matters on a casual dress.

Those that know the pattern may be aware that it "should" have two pockets, after two attempts to get the pockets even with the shifty fabric, I gave up and went with one! The fabric stretched slightly below the remaining pocket which is a tad frustrating; i've steamed it a bit to try and encourage it to shrink back into shape with some success but its still visible. 

I do feel it should have side seam pockets, initially I thought the fabric was too light to cope with them , but now I think i'll go back and add some. A dress without pockets is annoying. 

 I was super stocked at how well the grey thread blended into the fabric.... until I had to unpick a number of seams.
While I like this dress and I like how it fits, it is however a whole new silhouette for me and I'm not yet 100% convinced that it's "me". I do see potential for getting a lot wear out of it when camping and for after school activities with the kids so time will tell if it becomes a wardrobe staple. 

Saturday 7 May 2016

Me Made May.....week one

For years now, I've watched others participate in Me Made May and thought about it, however this is the year of giving things ago so I'm giving it a go.......

So I then forgot to actually post my Me Made May pledge (ooops) but did manage to get photos of (most of) week one (which I'm chalking up as a win).

My pledge therefore is: I, Kat, of Fantastikat creates, (fantastikat.blogspot.co.nz) sign up as a participant of Me Made May ’16. I will wear at least one item of me made clothing (but will aim for 2) each day for the duration of May 2016.  You can follow my progress weekly on the blog.

So for week one, here goes

May 1 - Ginger Jeans and Liberty Undercover hoodie no photo today :(

May 2 - Made by Rae Washi Dress (first real made by me item I made when I got back into sewing for myself several years ago!

May 3 - Grainline Morris Blazer and Blue Ginger Doll Peggy skirt (I can't find a link to the pattern now, wondering if she is no longer selling? ) 
My small companion in this shot is displaying her me - made Frozen dress

May 4 - Ginger jeans and Fancy Tiger Crafts Sailor Top (ooooh, very obvious in this photo I should have put on a lighter bra.....just to be clear, I didn't leave the house without a jumper today)

May 5 - Another Washi dress, this time made with Flamingo rayon 

May 6 - And surprise surprise my ginger jeans make another appearance, this time teamed up with a knit sewaholic pendrell and By Hand London Victoria blazer

Finally, May 7 - A Grainline moss skirt teamed up with my liberty Papercut Undercover hoodie

What have I learnt in week one?  I really need to make another pair of jeans! I also suspect that my rotation of clothes next week may be quite similar to this week........

Sunday 28 February 2016

UFO's?

For a looooong time (like since it began) I've read The Monthly Stitch posts and thought about participating, but never quite got around to it. My leap into the blogging world seems like an appropriate time to commit and so I went looking for the February theme.

UFO's.... Initially I didn't think I'd be participating as I generally finish most things, (I don't like to leave things unfinished). And then three things happened:
  • I cleaned out our spare room cupboard and found a wee bag full of UFO's that I had completely forgotten about
  • I found the many pairs of pants my 5 year old had worn out the knees on

  • My husband queried what had ever happened to the Surf to Summit top I started making him - I had reminded him that it had been finished but he whinged about the neckline being too tight and by then I had moved on to bigger, brighter things (and more importantly,  things for me) and never quite got around to changing the neckline. 
So I had things to finish....
  • My wee UFO's have all found new homes, either op (charity) shop, back into the stash to be remade into something else or (sadly) completely binned. 
  • My husband's top is finally finished
  • And, three out of four of the pants now have intact knees (both knees of the spiderman pants were ruined and I'd already patched them once 
Rather than unpick the side seams and then patch over the holes and then resew the side seams, for two of the pairs I decided to just slice out the holes and add in new fabric. Main reason was it seemed easier and meant I could double layer the knees. 
I'll admit, I really like the monster knees and part of the design is practical; the knees have double layers of denim, a layer of red twill and the teeth are microfleece. Hopefully with that layerage (made up word?) the knees will stay intact for another few months!

I'm not the only one who likes the monster pants


Saturday 6 February 2016

First post - Where to start?

I've spent years reading other peoples sewing blogs, months dithering about starting my own blog, and putting it off because life seemed busy, too hard to take photos and wondering what I could add to the world wide web. But, its a new year (sort of, February is still at the start) so here goes.

First things first. I'm Kat, I live in Wellington and sew things for me, my two small (3 & 5) children and husband. I frequently have ideas that seem really good at the start and several hours into the project the reality sets in (Frozen dresses anyone..... I still have nightmares from metres of sparkly tule).

I'm a Papercut Patterns patterns fangirl, along with Closet Case Files and am going through a bit of a Grainline Studio phase. I also sew a lot of Oliver and S and Made By Rae for the kids and find both of their patterns really adaptable to modify and personalise. Finally Thread Theory have been a win for stuff for my husband.

As a starting point, I thought I'd run through my projects for the year; these are the ones that I have the fabric for and really want to make. Also interspersed throughout the year will be some basics (like a plain black cardy, plain tops), stuff for the kids and no doubt new bright and shiny patterns (can anyone say new upcoming Papercut collection?)


So, clockwise from the top left, the plan for the chiffon foxes is the Meissa shirt from Papercut, the red floral is destined to some kind of blazer/jacket and the black/grey silk chiffon I think will be a Datura blouse from Deer and Doe. 

The purple lambskin was a Christmas pressie from my mum and will be a jacket: I'm leaning towards the Ziggi jacket but need to do a bit more research before I put on my big girl panties and sew a leather jacket 

The plan for the silver silk lurex involves an undercover hoody hack and may go horribly wrong, but hey it's worth a whirl. 

Dark grey is a wool mix and will be Guise pants (and are cut out as I type) and the grey fabric with the pink/orange/red flowers will be a Sewaholic Gabriola skirt (I've never had much luck fitting Sewaholic so have been putting off this project for a really long time; like since the pattern was released). 

The left bottom fabric is a navy and white design and will be a Morris Blazer (also cut out and just waiting for me to restock my interfacing stash before sewing it up). 

Finally the pink wool cashmere in the middle will be a Clare coat (original intention was to make it in practical black but as I wandered through The Fabric Store the pink jumped out at me, and shouted "buy me, buy me, I'm fabulous" so I did. (It helped immensely that it was 40% off)

Not pictured, but I have denim for two pairs of Ginger jeans that I need to make up before winter as my casual pants situation is getting a bit desperate.

So, thats me, some of my projects for the year, lets see how many I achieve and how many other bright and shiny things can distract me!